Quick n Easy: Gargoyle on the TP-Link TL-WR941ND
So getting Gargoyle going on the TP-Link TL-WR941ND is nice and simple (even for non-techies), and it gives you a reliable and easy to use router with some pretty awesome features.
This is a “Quick n Easy” guide that’ll have you up and running in 5-10 minutes!
I’ve previously recommended Gargoyle on the TP-Link TL-WR1043ND. The TL-WR941ND is the same, just without gigabit ports (Only 10/100… Which is fine coz that’s still faster than your internet unless you’re on 100mbps UFB), and there’s also no USB port. The upshot is you’re saving yourself 30% on the cost of the router!
So we’ll presume you’re using this with a DrayTek DV120 router that is already setup on 192.168.1.1 and is currently online. If you’re using another router, that’s OK, but the DV120 is highly recommended for its reliability.
To start with you’re going to want to download the firmware from the Gargoyle website:
http://www.gargoyle-router.com/download.php
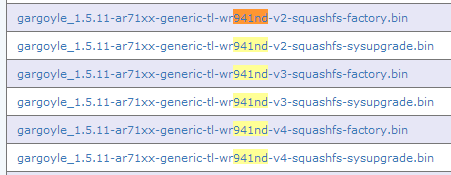
You want to check on the side of your TL-WR941ND box and there should be a small sticker that will tell you the Hardware Revision (version) number. If it’s 3.8 or similar, you can still use the v3 firmware. You always want to use the latest “experimental” version. It’s still very stable.
On the page, push Ctrl + F and search for “941ND” and you should get taken directly to the firmware. Download the one that says “-factory”, as this will factory wipe it when upgrading (Which we want, we don’t want it to try and use the TP-Link firmware config).
While the firmware is downloading, you want to unpack the TL-WR941ND, attach the antenna and power it on. Peel off the sticker from the back of it that advises you to use the CD and ignore that sticker warning completely. In fact, throw that CD away, you’ll never need it.
Plug your PC directly in to the back of it in any of the LAN Ports 1 -> 4. If you’re using a laptop, please make sure you disconnect from any wireless networks you may be on, at this stage. Switch WiFi off just to be safe, even!
NOTE: Before we go any further, we’re going to rename the firmware. For some reason it’s not happy about taking the long filename, so rename it from the “gargoyle_1.5.11-ar711xx…..” to “gargoyle”. Don’t forget to do this or you may run into trouble trying to get the TP-Link TL-WR941ND to “accept” the new firmware.
Now, in your browser, you’re going to want to try these two links. Depending on the version, and firmware it comes with, it will be using one of these two default IP addresses:
http://192.168.1.1
http://192.168.1.254
The default username and password are both “admin”. If the first link doesn’t work, try the second.
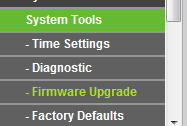
Once logged in, on the left-hand side choose “System Tools” –> “Firmware Upgrade”.
Choose the “gargoyle” firmware file (You did remember to rename it, right?!) and hit Upgrade.
It’ll ask you if you’re sure, this is the point of no return. Hit the OK button, then go grab yourself a cuppa. It’ll take around 3-4 minutes to “do it’s thing”.
When you come back, you can browse to:
http://192.168.1.1
You should now be greeted with the Gargoyle login screen! If after 5 minutes it’s still not coming up, try power cycling the Gargoyle router, give it two minutes, then try again.
You’re almost done now. You should be able to login to Gargoyle with the default password of “password”. Then, choose a new password that’s a bit more memorable, and select your Timezone.
We’ve got two things left to do: Change IP address so you can get online, and enable WiFi
We’ll change the IP address of the router so it doesn’t “conflict” with your broadband modem (Such as the DrayTek DV120). Click on “Connection” on the left-hand side, then under “Local Network / LAN” you’ll want to change the Router IP to something such as: 192.168.122.1

All other defaults in that part should be fine.
Next we’ll turn on the WiFi. It’s turned off as a “security” measure.
Scroll down to “Wireless” at the bottom. Change the Wireless Mode to “Access Point (AP)”:
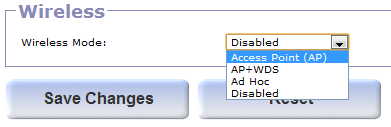
You’ll want to set the “Access Point SSID” (The “name” of your WiFi network), set the Encryption to “WPA2 PSK” (Which is the most secure), and set yourself a nice memorable password.
Hit “Save Changes” and you’re done!
You can now plug the “WAN” port of the Gargoyle router into the “LAN” port of the DrayTek DV120 and you should be online and good to go! Nice and easy right? 🙂
If this has helped you, drop me a comment below, or if you need a hand then just say Hi.
That’s a nice upgrade Chill. I actually successfully used your other tutorial for my ….941ND. But I read through this one anyway, and I like it. I actually struggled a bit with the Vigor 120, but the one I feared the most, the Gargoyle one, went pretty well. My wife has access again for her ipad – so all is well with the world. She got a bit grumpy “why do you have to change things when they’re working OK”.
Now I have to change some of the network settings on my servers. That could take some time! Network interfaces and such – 2 physical and 2 virtual.
Then onwards and upwards to have a look at OpenVpn.
It’s a common problem, my wife asks me that regularly.
Don’t forget if you’re using servers from the outside world that you’ll want to either port-forward, or even easier is to login to the DV120 and put the Gargoyle WAN IP in a DMZ. That way you can use things like OpenVPN on the Gargoyle, remotely etc!
HI, Chill
thank you for the instructions for both tp-link routers!
I recently have my 1043nd no longer working.
Was wondering if you can do a similar ‘quick&easy’ guide for the tp-link wdr3600 as well?
Heard that the 3600 is a popular version now.
And i recently went and got on that’s wdr3600 h/w version 1.5.
Is it as simple as uploading a specific gargoyle “factory.bin” through the stock firmware upgrade as wellll?
would any LAN router IP and other settings need to be changed as well?
your guide would benefit many,
thanks
Yeah pretty much 🙂 Same deal, that’ll flash it over to Gargoyle, it’ll likely still need the LAN IP changed etc 🙂
Nice router, I’m looking to get one myself!