Guide to CyanogenMod & AOSP Jellybean / ICS on the HTC One X
UPDATE: FAQs are at the very bottom of the page! 🙂
There seems to be a lot of confusion about getting the HTC One X running custom firmware.
It’s actually quite simple, there’s just a few steps that you need to take in order to first unlock the Bootloader, and then flashing the new firmware.
Thankfully the current AOSP Jellybean builds have matured incredibly quickly and bugs are minimal. It’s also really simple to update as new builds come out, though you need to obviously know about the “gotchas” or you’ll get yourself into hot water.
There are two “main” parts to this process of getting Jellybean on your phone:
1) Unlocking your Bootloader — Following HTC’s guide
2) Flashing the custom firmware — Following this guide
We’ll begin by unlocking your Bootloader (Following HTCs guide).
Speaking from personal experience I can tell you that HTC will still honor their hardware warranty even after you do this (Though they’ll kick up a bit of a fuss about it), but if you do happen to brick your phone (With a bad flash somehow) then you’re basically on your own. You’re in luck though because it’s pretty tough to permanently brick your phone, and following this guide will go a long way towards helping. That said I obviously take no responsibility for anything that goes wrong etc…
YOUR DATA WILL BE WIPED! FULLY! EVERYTHING! Including whats in /mnt/sdcard!
(The FULL wipe occurs when you unlock your Bootloader, on any phone. If your bootloader is already unlocked then the /mnt/sdcard contents will likely be kept)
That said, the process isn’t that scary and we’re here to hold your hand
Part 1) Unlocking the Bootloader
(Following HTC’s Guide)
Before we begin, now is a good time to backup your SMS messages using SMS Backup & Restore: https://play.google.com/store/apps/details?id=com.riteshsahu.SMSBackupRestore
So make sure that you take your SMS Backup XML file and copy it to your PC!!
Now, first of all, you need to go through the HTC registration process by clicking on “Register” at the *very* top-most part of the screen ( http://www.htcdev.com/register/ ). This is a *must* because HTC will email you the unlock code for your phone.
Once you’ve gone through the registration process, we’re going to unlock your Bootloader by going to http://www.htcdev.com/bootloader/ (Or go to htcdev.com and click “Unlock Bootloader” and then “Get Started”).
Select your Supported Device on the right-hand side as “All Other Supported Models”.
It’s going to tell you to download the SDK and things. Don’t bother, it’s a pain and takes forever, and you really only need a couple of files from it. Instead, grab this:
fastboot-adb.zip (Windows)
adb-linux.zip (Linux)
They’re just the essential files needed to run adb and fastboot.
Extract them and use them when it references adb and fastboot.
Follow through all the steps to unlock your Bootloader (You’re going to need a valid email address coz it emails you a file to unlock your phone).
I won’t go through it here, as HTC do a pretty damn fine job of guiding you step-by-step. Again, I’ll just say that you need to follow through their steps provided at http://www.htcdev.com/bootloader/
Part 2) Flashing the custom firmware
Once you’ve got your Bootloader unlocked, it’ll start rebooting into the standard firmware and you’ll be greeted with the setup process again.
If you wanna go through it, that’s cool, basically just skip *everything* and turn on USB Debugging
NOTE: For Linux, you run something by typing ./adb or ./fastboot whereas in Windows you just type adb or fastboot (When in the same directory). I’ve written the guide presuming you’re in Windows but I’m using Linux myself in the screenshots.
Open a terminal / command prompt and find your extracted adb / fastboot files. You want to run:
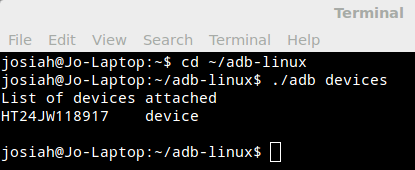
adb devices
If you don’t see your device, then make sure you’ve got USB Debugging turned on.
Now before we proceed we’re going to copy the firmware across. You can do this by using copy / paste, or use adb as I’m about to show you
Put the gapps and the ROM .zip file into the same directory as your adb files and run:
adb push tg_endeavoru-ota-30.zip /sdcard/tg_endeavoru-ota-30.zip
adb push gapps-jb-20120726-signed.zip /sdcard/gapps-jb-20120726-signed.zip
(Again, my screenshot is slightly different because I’m running Linux)
You won’t see a progress indicator until its done. If the cursor is flashing, that’s good, means it’s copying:
Then later becomes (When it’s finished copying):
This will copy the ROM and the GApps across to your phone ready to be flashed!
Now, on your PC, open up the firmware file (In this case it’s tg_endeavoru-ota-30.zip) and you’ll see a “boot.img” file. Extract that one fileand place that into the same directory as your adb and fastboot files. This is the Kernel file that has to manually be flashed at the moment due to restrictions from HTC.
Now comes the juicy part of the flashing!
You should have the boot.img file extracted, and both files pushed across to your phone successfully. Now we’ll restart your phone into the Bootloader using:
adb reboot-bootloader
Your phone will now restart and you should be greeted with a nice mostly white screen:
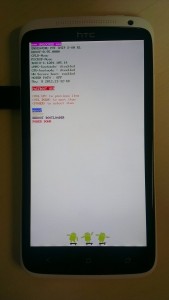
From here you want to now switch to using the “fastboot” command rather than adb. Fastboot is used while you’re in the bootloader.
Start by running:
fastboot flash boot boot.img
This tells it to flash the /boot partition with the boot.img file that you extracted from the ROM earlier. You should see a nice confirmation on your PC screen, but nothing on your phone screen at this point in time:
Next you want to run:
fastboot erase cache
We’re about to boot into Recovery to do the flashing of the firmware, however first of all we’re going to need to flash the custom recovery.
Download ClockworkMod Recovery (Touch) from here: http://download2.clockworkmod.com/recoveries/recovery-clockwork-touch-5.8.4.0-endeavoru.img
Save that to the same directory as your adb / fastboot files and then run:
fastboot flash recovery recovery-clockwork-touch-5.8.4.0-endeavoru.img
Recovery is FLASHED!
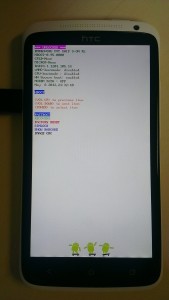
Next, on your phone use your Power button to choose “HBOOT”. It should already be highlighted on HBOOT, but if not, use the Vol-Up / Vol-Down keys to select it.
You’ll see a few “Failed to open…” flick past, that’s fine, always happens, don’t worry. They’ll disappear off your screen in a flash and you should now see:
This screen looks similar, but is *slightly* different.
Push Vol-Down once to highlight “Recovery” and then the Power button to go into recovery.
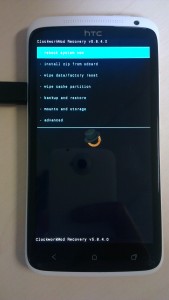
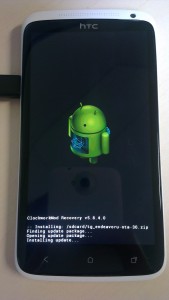
You should now be greeted by ClockworkMod Touch Recovery:
Select “install zip from sdcard” then “choose zip…” and scroll right down to the very bottom and select your ROM:
You then want to repeat the whole process with the Gapps!
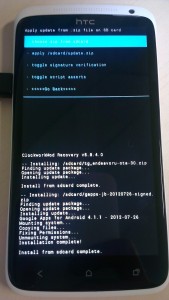
Once you’ve done that, your screen should look like this:
Both have installed successfully. Simply hit “Go Back” a few times to go back to the main menu.
Finally, you need to Factory Reset and wipe everything again thats left over from your last ROM.
Do the Factory reset, then go back to the main menu and then hit “Reboot now”.
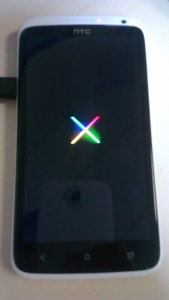
Your system should reboot and you’ll now see the lovely Nexus boot animation if you’re using the tg-endeavoru Jellybean AOSP ROM:
Frequent Questions
Do I need to wipe between ROMs?
If changing ROMs such as from AOSP to CyanogenMod or AOKP, then yes.
If you are simply upgrading your current one to a newer build (Such as from build 25 to build 30) then no wipe should be required.
What about going from ICS -> Jellybean?
Yes, wipe, you won’t be coming from the same “vendor” so you should wipe.
How do I upgrade to a new version?
1) Extract the boot.img from the new ROM
2) Copy the new ROM and Gapps (if applicable) across to the phone
3) Reboot into Fastboot
4) fastboot flash boot boot.img
5) fastboot erase cache
6) Boot into Recovery
7) Flash ROM
8) Flash Gapps
9) Reboot
I’m boot-looping or can’t boot after flashing, what do I do?
You didn’t flash the boot.img did you? Reboot into the Bootloader and run:
fastboot flash boot boot.img
 fastboot erase cache
then reboot.
Otherwise, try factory resetting from within Recovery.
How stable are the ROMs?
It varies but already after just 2-3 weeks after Jellybean was released to AOSP we have a number of surprisingly stable ROMs out there. They’re not without the occasional bug, but most definitely usable as a “daily driver”.
Why do we have to flash the kernel separately?
HTC haven’t allowed it to be done from recovery yet, look up “S-OFF” for more info on this. We are hoping this is resolved soon.
I can’t flash the ROM, it fails. Why?
You have a real old version of Recovery, your download was bad, or you’re using the International version with the 4G phone…
Where’s my on screen menu button?
Its gone, the multitasking / app-switcher button is now your Menu button. Push and hold Home for 1 second to switch between apps instead! Its a much better use of screen real-estate!
I want the notification toggles that I had in CyanogenMod! How can I get them back?
Try one of these two apps:
https://play.google.com/store/apps/details?id=de.j4velin.notificationToggle
https://play.google.com/store/apps/details?id=com.painless.pc
Which kernel should I be using for this?
For now it’s actually best if you stick with the kernel that ships with it. There are a number of other ones out there but while development is still being finalized on the ROM, stick with the standard one. If you experience any issues at all, before you go crying in the XDA Forums, it’s best you do a full re-flash of the ROM and stock kernel, and see if you can reproduce the error.
That, and a number of people just presume they need a non-standard kernel to “get the most outta the phone”. That’s a myth and a lie. More often than not, a standard kernel works marvellously! On top of that, many people struggle to find which kernel to use, how to flash it, and it’s just not worth the extra hassle.
Why does my battery life suck?
It’s something still being actively worked on, but at the moment it’s pretty decent, there’s likely an app causing the issue so look up “Better Battery Stats” and see.
Where do I see the list of outstanding issues?
You can see all the outstanding issues here: https://github.com/tg-endeavoru-jellybean/android_device_htc_endeavoru/issues?state=open
Issues are best discussed there if you can reproduce it rather than in the XDA Forums
I want to help, I think I’ve found a bug, what should I do?
First of all you *need* to provide logs. The more information the better!
You also need to tell us if you’re running anything like a custom kernel, or if you’ve added any other mods such as changes to include Advanced Power Menu and things.
Finally, as many steps as you can about how you reproduced it. Saying “Oh my bluetooth doesn’t work” is no help. Saying “My bluetooth headset won’t pair with my phone, but it did previously on stock firmware and on ICS ROMs” is much better!
 Chilling_Silence's blog


How long should the Nexus boot animation be visible? I followed al steps, but it keeps showing me the 4 coloured cross.
Thanks.
Hi Mike,
You probably either forgot to flash the kernel, or you didn’t do a full wipe when coming from stock Sense UI. Double-check those and try again 🙂
i have the same problem, would you be so kind to assist me..?
ThanX
Hi there,
Have you flashed the kernel from your PC using Fastboot? That’s the *most* common cause for it. That, or you have the One XL which is not the same as the One X. OR, you’ve tried flashing a non-standard kernel. Always use the one from inside the firmware .zip file and you should be fine.
Let me know how you go!
Good luck!
Cheers
Chill.
It worked for me, thanks a lot. (I have a One X of coarse…)
Hi could you please help me? I did everything from
“Next you want to run:
fastboot erase cache” onwards and i did not back up my stock ROM. I’m very new to all these and I really dont know what I’m doing. I’m stuck at the 4 coloured cross screen as well. How do I go about flashing the kernel as you stated in the comment?
Hi Stefhanie,
You didn’t run:
fastboot flash boot boot.img
You’ll need to extract the boot.img from the firmware file as mentioned, boot your phone into Fastboot (You can to this by holding down the Volume Down button while pressing the Power key. Select Fastboot Mode from the options displayed on your screen and use the Power button to select it.), and then run that command from your PC. It should show up like it does in the screenshots.
Again this is in the FAQ at the bottom too.
thanks so much for replying so fast. I have another problem though, I forgot to put the gapps into my phone, what can i do now? I’m stuck at the step where i have to “repeat the whole process with the Gapps”…. really sorry for being so troublesome
That’s fine, just restart your phone like normal and when Android boots up it *won’t* do the “Sign in to your Google account” walkthrough. You can then plug it in to your PC and copy across.
Then, reboot back into recovery, factory reset, then flash the Gapps package and you should be good as gold! 🙂
There are other ways but that’s probably easiest to explain…
Thank you so so very much! Have a good day 🙂
When I run ./fastboot flash boot boot.img the terminal just says “”. A quick google search didn’t help. Any idea what could be causing this?
Yeah that should be “Waiting for device”.
Yeah it’ll be pending the device, likely a driver issue. Try here: http://forum.cyanogenmod.com/topic/13150-adb-devices-works-but-not-fastboot-devices/
Okay, fixed it. For those interested, fastboot needed sudo access.
Thanks for that. It’s interesting because it *shouldn’t* need root access on your linux PC. If the device permissions were setup correctly it ought to work just fine as a regular non-privileged user.
Followed the guide, got phone running but for some reason the phone cannot detect any networks operators. When I try to turn Wi-Fi on it gets stuck on “Turning Wi-Fi on.” Is there any reason for this? I’m completely new to this and a quick Google search didn’t turn anything up. Could I get some help?
How long did you leave it after it booted? What Telco are you with?
Well I’m not in the States actually. Does this not work internationally.
Of course it does. I’m from New Zealand 🙂
Nice Guide everything worked for me, but is this ROM actually working for the everyday usage?
WI-Fi and everything works but I’m trying get connected to my cellphone provider but nothing happens. Would love to have that ROM as my default system because I love the Holo Theme and couldn’t get the Nexus 7 Smartphone. 🙁
Yeah it works fine as mentioned.
Who is your provider?
Also the Nexus 7 is a tablet, not a smartphone, it specifically doesn’t have any Cellular radio capabilities.
My Provider is Vodafone Germany, well Im talking about the smartphone. 😀
I just see a “X” nexus logo where all colors are just moving and no main screen
Hey mate, check the FAQ, its the boot.img missing 🙂
Hi, I went through this but I must missed the part where I was supposed to wipe so it wouldn’t boot up, just got the flashing cross loading. I rebooted into the bootloader to see what I could do but I can’t connect the computer to the phone, I’m guessing because at this point it’s no longer in usb debugging mode. I had made a clockwork mod backup and so ran that, but now instead of getting stuck on the flashing cross loading screen it’s getting stuck on the HTC one loading screen.
What do I do? If I go back to bootloader to do a wipe I won’t be able to get the files onto the phone to flash, or will I?
Hey guys im having the same issue im stuck on the nexus logo. Have tried to reflash boot.img and clear cache but get this error:
fastboot flash boot boot.img sending ‘boot’ (4164 KB)… FAILED (command write failed (Unknown error))
finished. total time: 0.640s
Any ideas on how to fix that???
Hi Nick,
You could try the following:
1) Check your data cable
2) Re-flash your recovery
3) Re-download the ROM.
Good luck!
Hi Philip,
I believe you can get back into Recovery using either Vol-Down & Power buttons (From the phone being off) or Vol-Up & Power. If that fails, try Vol-Down + Vol-Up + Power (From off). One of them will work and get you in to recovery 🙂
Uh oh… I’m in the same boat too, was stuck on the jellybean startup screen –> clockworkmod recovery –> now stuck on the HTC one loading screen. I read all of the problems so far and how to avoid them.
Tried all the above suggestions and followed these instructions exactly. Only difference is I installed OTA 33 instead of 30 🙁
Re-flash your boot.img
Do you get any errors?
Hi, This is a tad off subject but do you know how to relock the phone so it will accept Telecoms latest ota update? I tried to relock it and it seemed to work but where it has “locked” now it says “relocked” Cheers Matt
I was having trouble getting the system to boot, possibly the same problem as some others describe. I was doing everything per the instructions above and getting no error messages, but boot would stall on the glowing X animation (adb worked but sdcard was not mounted).
Locking and unlocking the bootloader again worked for me. Now I can flash the prebuilt kernel and ota zip or ones built from tg sources. Hope this helps others.
I was also stuck in the endless boot animation, and yes – I did flash (and re-flash) the boot.img and cleared the cache each time, but this didn’t help. Until I figured out that I needed to run the reset data command from within the recovery before flashing the ROM. Once I did that, I got past the boot animation. Perhaps you might want to add that to your tutorial.
Wow can’t believe I missed that part off. Appreciate the heads up, thanks. Guess I kind of took that for granted, should have thought about that. Cheers!
…and now it’s not working any more. Stuck at the “htc \ quietly brilliant” screen. I’ve tried multiple times with relocking, unlocking, factory and reset data…nothing.
Could you post a guide to do this purely for Linux .. I am getting very confused with the windows commands.
Thank you in advance.
Hi Shiv,
Linux is the same as windows, just prefix the commands with “./” which means “Run the file in this current directory”. For example you would do:
./adb reboot-bootloader
./fastboot flash boot boot.img
./fastboot erase cache
Easy 🙂
Sounds like the kernel hasn’t been flashed and / or factory wiped after.
Thanks for the hard working and the nice MOD.
Just wonder how complete or mature this ROM is, comparing to others with official source code from phone companies? I am still sticking with HTC’s ICS ROM, though I did try out the ROMs from you guys. The battery draining is a big issue.
Anyway, thanks again!
Yeah aside from the battery drain (Which is easily on par if not better than CyanogenMod 10 at the time of writing, I tried CM10 for two weeks), it’s pretty darn stable 🙂
Hi really good guide my only problem is after ive unlocked the bootloader it wont list the device in cmd and ive checked and doubled checked that debugging is on but it says “List of devices attached” then blank underneath you think its because im running windows 8 preview?
Yes, possibly. Check your Windows Device Manager and ensure its detected and working OK 🙂
well i got it to work thanks ! for anyone else with this problem use this guide to get the drivers working!
http://forum.xda-developers.com/showthread.php?t=1674581&page=2
I followed all of the steps, but my phone only boots into the OS when the USB is plugged into my computer. When the OS does load, wifi does not work 🙁
Any idea what might be causing this?
What model One X do you have? Tried doing a full re-flash, including boot.img, and a factory wipe afterwards?
Great guide – this was easy to follow. I initially had trouble with drivers – didn’t have HTC Sync installed – so at the ‘adb devices’ – didn’t detect anything. Downloaded the latest HTC Sync Manager – which failed to install the driver on Win7 64 bit! Found an older version of just HTC Sync – installed, which solved that problem. Everything else has been working sweet except the weather, which for some reason only started working after a reboot of the phone. I’m using an HTC One X. Be interested to see if battery life improves.
Same as someone above, WiFi won’t switch on.
Skipped this step during set up steps, can’t turn it on in main settings either. My data connection is also not working and I cannot connect to any operator. The device seems to think it is in airplane mode, which it isn’t.
Not sure if this is something which you have come across or know how to fix, are there any other details which would help you?
i did above and boot ok it just stuck on Android is upgrading starting apps.,
Any Idea??
worked but no network????
any help
Sounds like you’re rushing it. If you followed the instructions, you should have network. If not, provide more details.