Gargoyle on the TP-Link WR1043ND
Updated 29/6/2013:
Gargoyle is some of the best custom firmware you can get for a lot of routers. In fact, it’s better than a lot of standard firmware by a long shot. Gargoyles benefits are summed up well on the ‘shop” page of the gargoyle-router.com website:
Gargoyle is the only solution on the market that lets you monitor and set monthly bandwidth caps for every connected computer.
Effortlessly identify the users abusing their network privileges and lock them down.
Best part is they’re right! It’s incredibly easy, and I’m going to show you how to do it here. It’ll only take a couple of minutes, and there’s nice images to guide you the whole way.
Starting off with ordering, just be careful when you order the router.
I have previously ordered the cheaper TP-Link WR741ND in the past and hit the snag of it being a “too recent” model and it’s not supported because of the SoC (System on Chip) used in it. Basically TP-Link completely changed the guts of that model and so the newer revisions basically don’t work with OpenWRT (Which Gargoyle is based upon).
So stick with the TP-Link TL-WR1043ND and you should be fine!
I picked mine up from PBTech for $85, it’s well worth the investment! http://pbtech.co.nz/index.php?z=p&p=NETTPL1043
Once you have it home and unpacked, you’re going to want to pre-download the firmware:
You want to go to http://www.gargoyle-router.com and click on Downloads. Change the Architecture to Atheros AR71XX and choose the one for the TL (For TP-Link) WR1043ND
Now, there are two options: one is “factory” and the other is “sysupgrade”. You want the factory one, so that it factory-resets the data (It won’t upgrade from the TP-Link standard firmware anyway).
This version shown in the screenshot is Gargoyle 1.5.5, but there are newer versions coming out all the time. As a rule of thumb, always start with the latest Experimental Version and work backwards if you run into issues.
NOTE: Don’t get anything older than 1.5.6 if your TL-WR1043ND is version 1.10, it WILL brick the router: http://wiki.openwrt.org/toh/tp-link/tl-wr1043nd#warnings.gotchas
And by “brick the router” I mean you’re going to have to return the unit because it’s completely dead, so ALWAYS start with the latest Experimental version of Gargoyle experimental DO NOT use the older 1.4.X branch, ever… Just don’t.
Now, get the firmware saved to your PC, then it’s time to get your PC plugged in to the back of it. Ignore the sticker on the back of it telling you to run the CD first, you specifically don’t wan’t to run the CD for Gargoyle. peel it off and plug in to one of the LAN Ports.
You technically can also do the initial part via WiFi because it’s initially an open un-encrypted network. However, once you’ve flashed the firmware you’ll definitely need to be plugged in, as Gargoyle safely keeps WiFi turned off by default:
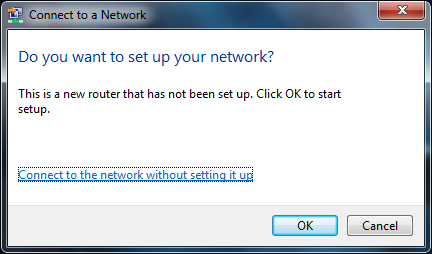
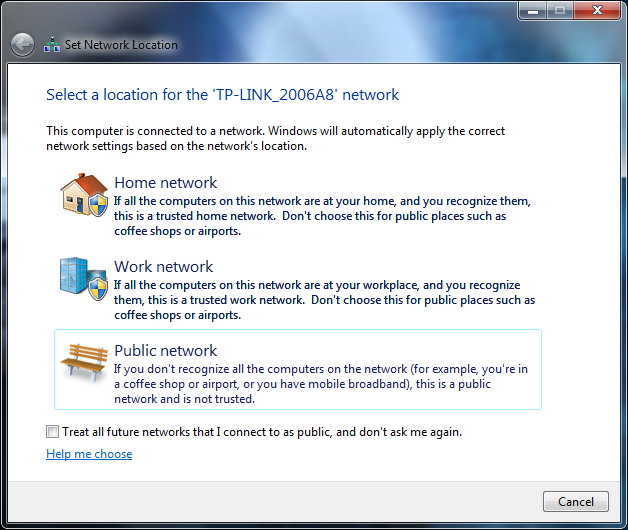
Once you’re either wirelessly connected or plugged in, you’ll want to tell it that you’ll connect to the network without setting it up. Then, select “Business Network”. It doesn’t matter if you choose “Home Network”, but it just skips asking if you want to use a Homegroup:
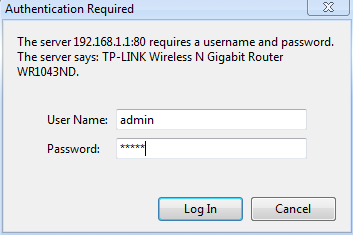
Once connected, you’ll want to login to the routers WebUI: http://192.168.0.1
When prompted, enter the username of “admin” and the password of “admin” as well:
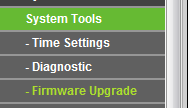
Now, on the left-hand side, click on System Tools –> Firmware Upgrade:
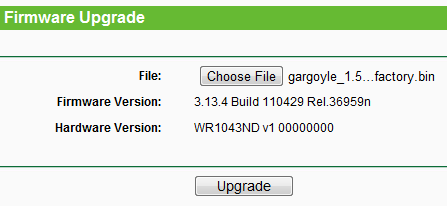
Click on “Choose File” and browse to your newly downloaded firmware file, then click Upgrade:
It’s going to ask you to confirm if you want to wipe the firmware. This is the point of no return. Click on OK to continue:
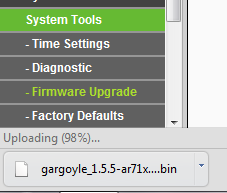
If you’re in Chrome, you can look down the bottom-left and see the upload progress. It should only take around 30 seconds:
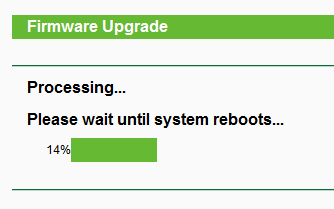
Once it’s uploaded, it’ll start processing the firmware and flashing it to the router:
TIP: If you run into any issues with the Gargoyle firmware filename being too long, it’s not the end of the world, just rename it to “gargoyle.bin” and try again. (Thanks Mac for the heads-up!)
It’ll take around a minute to flash it. Once it’s completed, it’ll then start rebooting:
Now, this is the point that you *must* have your PC plugged in to the back of it in any of the ports.
You should shortly afterwards be presented with another login prompt. If not, click on here: http://192.168.1.1
The default password for the Gargoyle firmware is “password” all in lower case:
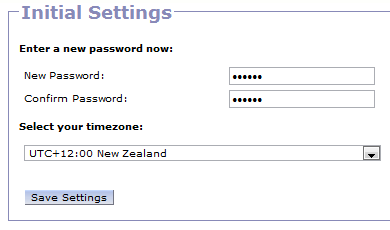
It will go through a real quick “First run wizard” asking you to change the password (Go on, you know you want to, keeps it safe), and change the time-zone as applicable:
That’s it, you’re all good to go, firmware is installed!
However, before you go jumping for joy, there are TWO gotchas to watch out for:
Firstly, the LAN IP address of your Gargoyle should not be on the same range as your DSL Router.
For example if your DSL Router has an IP address of 192.168.1.1 or 192.168.1.254 as most do, then you’re going to want to change the LAN IP address of your router to something different.
Do this under Connection on the left-hand side, then change under “Local Network / LAN” the Router IP to something such as: 192.168.122.1
Finally, you probably want to turn on your WiFi by going to “Connection” on the left-hand side and then scroll down to “Wireless” at the bottom. Change the Wireless Mode to “Access Point (AP)”:
You probably want to try and use the WPA2-PSK where possible because it’s the most secure. That said, even WEP is better than nothing.
Finally now, when it comes to getting it connected to your router, for the better part you can leave the WAN connection (Also at the top of the same page where you’re setting your WiFi settings) set to “DHCP”. Then, just plug the WAN port of the Gargoyle router into the “LAN” port of your normal broadband router.
If you’re technically minded there are a few things that you can do, some routers work better than others. For example, if you use this Gargoyle router in combination with the likes of the Linksys AM300, you can run the AM300 in half-bridge mode. You can also use the likes of the Draytek DV120 in PPPoA -> PPPoE Passthrough mode. Not only are those two ADSL Modems some of the most reliable available for <$150, but they’re also ideal because they alleviate the “double NAT” issue.
However, for most home users, that’s a complete non-issue, and so simply plugging the Gargoyle Router into the back of your ADSL Router is going to work just fine, while still giving you a ton of benefits from this router!
If you ever have any connectivity issues, ditch your ISPs router and get a Draytek DV120. They’re cheap as chips and INSANELY reliable. That, or if your WiFi is dropping, check nearby cordless phones, try unplugging them for a bit.
If this has helped, leave me a comment below and say hi.
 Chilling_Silence's blog






I’ve been trying to follow your advice for a while now Chilling Silence, but as you may recall, couldn’t buy the hardware to go with Gargoyle!
Thus, this is great news 🙂 (except now the DV120 is not at my branch of PB Tech so they’re bringing one in).
One thing puzzles me though – I can’t find a spec for how much ram is in the TP-Link WR1043ND. Can you tell us what yours has?
Snoi.
Yeah if you’re in the IT Biz it’s probably worth setting yourself up as a SnapperNet Reseller.
They have 8MB of Flash and 32MB of RAM — Screenshot from my router: http://i.imgur.com/eJ4VC.png
Only thing that beats it is the DV2750-series of VDSL2 Draytek routers which have 64MB of RAM.
http://pastie.org/4241948 is the console output 🙂
Thanks. As the WR1043ND is a router, I presume if I want to use it with a DV120 (per http://www.c2s.co.nz/blog/router-reliability-musings/) to give myself a Gargoyle solution, then the DV120 will do the authentication to the ISP, and will not need to be in bridged mode? i.e. it’ll be a std adsl setup, and the router will just connect to an ethernet port and used a fixed IP address?
In a nutshell, yes.
You can also do PPPoA -> PPPoE Passthru which then means you can set the WAN of the Gargoyle router to be PPPoE, so the Gargoyle router gets the real-world IP Address. Means you don’t have to muck around with double-NAT.
However for ease-of-setup, you’re right on the first count, and it’ll work happily too. The WAN of the Gargoyle will end up being 192.168.1.10 or something, so just make sure the LAN of Gargoyle is changed to a different IP range (For example I setup my parents as 192.168.123.0/24 and that works fine).
Sorry to be dim, but if I set the DV120 to PPPoA -> PPPoE Passthru, is the authentication to the ISP still done at the DV120? i.e. the WR1043ND is a pure router, so it doesn’t know anything about the ISP, right? (i.e. it has no ADSL modem).
I prefer to avoid the double-NAT issues, so want to make this work. I originally thought I needed to find an ADSL Wireless Router to do the Gargoyle job, but then you raised the WR1043ND here, so I am trying to get my head around the difference.
Cheers man!
As someone who just picked up the WR1043ND expressly to install Gargoyle, this article certainly made my experience extra-cushy. Love the July publish date.
Paid about $55 in Indonesia for this after not being able to get Netgear WNDR3700 V1 V2 or WNDR3800.
The WR1043ND has the same chipset with less RAM at less than a third of the price… a sign of the times.
Appreciate your post
I got a DV120 and TL-WR1043ND today, so am just wondering about the above? Thanks mate 🙂
Sorry, must have missed the previous notification.
Basically if you’re doing PPPoA -> PPPoE Passthru, the authentication is then done on the Gargoyle device. You’ll change the WAN Interface to PPPoE (And not DHCP), then put your ISP details in there.
Thanx for the advice, I purchased a WR1043ND and installed the Gargoyle s/w no probs at all. Very easy to follow instructions, so appreciate your guidelines. My next requirement is to put in the limitations for the various devices…and was wondering how I might get some help on this.
Cheers, Spice.
That post comes next… Almost finished!
Wow – got the DV120/WR1043ND combo going and am really glad I did it. Internet performance for everything is better (noticeable in that the lag/delay we all got used to seems to be gone – one day into it at least!) Wireless range and reliability better too, but both improvements to be expected over and above the ex-Telecom D-Link G604T I suppose (mind you, it didn’t fail in over 2 years, just slowed under pressure, so I have to thank it for that).
The WR1043ND worked well on its own firmware then great under Gargoyle (thanks – your instructions saved a lot of head-scratching and took away any fear of getting wrong firmware on there).
I’m surprised Gargoyle shows everything by IP – all hostnames are unpopulated, but maybe that’s due to my DHCP staying on the server I have? The WR1043ND is the default gateway/router for everyone, so stats/usage are logging as I hoped.
Question: How do you manage the DV120 once it’s in PPPoA-PPPoE bridge mode? I can’t browse to it’s IP, so maybe I need to attach it to laptop long enough to look at it, if I ever have to?
Anyway, thanks for all your help – this brings bandwidth usage and even browsing transparency into the household at a very reasonable price – I was thinking I’d need a SonicWall and $1000/annum subscription to get any sort of view/control over what the kids are doing. No need to be a Big Brother here, but it sure makes a difference to behaviour when everyone knows they can be checked up on if they start to step out of line, and earn themselves some restrictions or whatever.
Cheers man. Awesome.
Hey mate,
Glad I could help! It really does make a massive difference huh?
It’ll only show hostnames if it’s the device that gives out DHCP. If it’s not, then it won’t.
Once the DV120 is in PPPoA -> PPPoE Bridged mode, it’s not accessible, so you unfortunately can’t see the DSL Line / Sync stats. You’ll get good at looking at the lights on the router. The AM300 has a slight benefit there in that in its halfbridge mode you can still get to the WebUI and see the line stats.
For the better part though, you just ring your ISP and complain, the issue is either going to be them or your house wiring…
Keep in mind you can go to Status –> Web Usage and enable the Web Usage monitor. I’ve got mine to 2000 sites and 1000 searches. Best part is the router doesn’t even break a sweat!
Glad you’re enjoying it. I’ll be finishing the blog on getting the most out of the Quotas shortly, as they’re incredibly useful too!
Cheers
Chill.
Sadly for now the dream of being able to assign quotas on a home router is over for now. The very latest TL-wr1043nd v1.8 no longer work with gargoyle – the WLAN port is disabled under gargoyle which kind of defeats the purpose. I and a friend both ordered these , his worked mine didn’t. . Website below explains why. … I managed to brick mine in an effect to get it to work in the end
http://wiki.openwrt.org/toh/tp-link/tl-wr1043nd
Sorry mate, I think you’re confusing the WAN (Internet port) with the WLAN (WiFi). WiFi works perfectly.
I’ve lodged a bug for this on the Gargoyle forums ( http://www.gargoyle-router.com/phpbb/viewtopic.php?f=8&t=3016 ), but that helps point me in the right direction, thanks.
According to here, it looks like it’s more an upstream bug than anything specific with Gargoyle. Luckily it seems it’s fix-able (And certainly being worked on): https://dev.openwrt.org/ticket/11898
Appreciate the heads up! Cheers!
Sorry about confusion re the port name . Fix will come too late for my brick . Looking around there are others who have had this issue – aparently dead wan . Yes wifi seemed fine in fact everything else was ok except quota as that didn’t work as wan didn’t work
Yeah that’s unfortunate. I’ve still got one for a workmate I’m working on. Odd thing is that both his and mine are Hardware Rev 1.8, bought from the same store approx 3 weeks apart… Mine’s working brilliantly! His isn’t :-/
I have tried OpenWRT just a few hours ago and have been trying gargoyle for last few minutes. With both of those I cannot get internet on my PC. I had to change my MAC address on WAN as my ISP gave different MAC (and static IP). My WAN can ping to external websites … I just can’t use internet on my PCs 🙁 … Do you have any fix?
Yes, there’s a known bug relating to this particular router model.
I started this thread on the official Gargoyle Forums, and posted a link to the firmware you can download if you’re having issues:
http://www.gargoyle-router.com/phpbb/viewtopic.php?f=8&t=3016&start=30
The firmware I’ve shared via my Google Docs should be done in this manner:
1) Standard TP-Link firmware
2) German firmware with this bootloader fix
3) Gargoyle firmware
THEN the WAN port should work for you 🙂
Yeah guys…follow Chilling_Silence steps and all will be sweet with version 1.8. I’ve flashed several this way and WAN working perfectly.
Regards
I tried your your steps. Only thing was; I tried installing latest version (1.5.7). Do you want me to install 1.5.6 (the one which you have uploaded in your google drive)?
Yeah 1.5.7 vs 1.5.6 doesn’t matter too much, just flash the first two from the Google Drive link 🙂 Should really update the main blog with this now that it’s become an issue.
Hi Chill,
Can I setup vpn such as Hide My Ass directly in Gargoyle?
That way I don’t have to install HMA software on all devices that connected to the router.
Thanks, W
If they can give you an OpenVPN cert, then sure!
Hi Chill,
Need your assistance here.
I just received the TL-WR1043ND and trying to install Gargoyle in it without much success.
After I choosed gargoyle_1.5.7-ar71xx-generic-tl-wr1043nd-v1-squashfs-factory.bin and then clicked the upgrade button, I got a popup that says “Please select an upgrade file”
I then flashed using the first 2 files on the Google drive and tried again. The popup now says “bitte wahlen sie eine upgrade-datei aus” which basically said the same thing.
I even redownloaded the Gargoyle firmware thinking the first one was corrupt but no dice.
Can you help?
Thanks,W.
My bad. I downloaded the wrong file.
I downloaded the experimental branch version 1.5 instead of stable 1.4
Have you heard if you can use gargoyle with the 1.9 WR1043ND?
I checked PB Tech today and they are the only ones they have instore now.
Yes I believe so!
I have WR1043ND V1.9 and I want to install Gargoyle 1.5.9, will I have the problem with the WAN Port?
Thank’s
I know they were looking at fixing it but I can’t confirm if it’s fixed in 1.5.9, so I’d just stick with this method and then “upgrade” if you wanted to be absolutely safe 🙂
Thank’s for the response.
I have already the TP-Link firmware installed out of the box, next :
– I installed the german firmware with the fix via the web interface?
– After that, it will be in German?????
– I have to install the gargoyle upgrade firmware vie the web interface that will be in german???
Thank’s
Alain
Yup it will be, but it’s not too bad because everything is in the same location in German as it is in English. That and it’s pretty easy to see what will take you to the Upgrade.
Thank’s
If I go directly with gargoyle 1.5.9 Factory onto my WR1043ND v1.9 and the WAN port is disabled, what will I have to do? Will I be able to reinstall the original TP-LINK firmware via the Interface WEB?
Thank’s
Alain
Grab the .zip I uploaded. Go to Stock, then to the German version, then to the latest Gargoyle 🙂
Works wr1043nd v1.9 with Gargoyle 1.5.9 directly without passing by german firmware
Thank’s
After Flash with gargoyle ….-factory.bin , how to Revert Back Original Firmware tl-wr1043 ? Which file ? I do not wanna make a mistake and kill the router.?!
I have TL-WR1043 ver. 1.8
Tried my WR1043ND but no WAN light on after upgrade, just realized my HW version is V1.10 not V1.1, it has the same problem as V1.8, will try it tomorrow to report how it works on WR1043ND V1.10.
Flash back to stock through the Gargoyle WebUI, under System –> Update Firmware
Hi Mikeit,
That’s interesting, I was under the impression it was just the newer models. Good luck with the downgrade / upgrade again, use the .zip mentioned here to go back to stock, then to the German firmware, THEN to Gargoyle and you should be cool 🙂
Keen to hear how you go!
My ruter model:
– TL-WR1043ND ver. 1.8
– s/n 11c616……
– FCC-ID Te7WR1043NX
I Flash my ruter with gargoyle, firmware: gargoyle_1.5.6-ar71xx-tl-wr1043nd-v1-squashfs-factory.bin (warn-other newest firmware gargoyle_1.5….-factory.bin not yet start flash proces) .
Flashing process complited with gizmo64 method:
1. Revert back to TP-Link firmware. wr1043nv1_en_3_9_17-sysupgrade.bin
2. Flash with this German firmware wr1043nv1_de_3_9_17_up_boot(100331).bin
3. Flash with gargoyle_1.5.6-ar71xx-tl-wr1043nd-v1-squashfs-factory.bin
Everything went OK, I’ve properly configured ………..
WAN port – NOT WORK for me !!!
Revert back to TP-Link firmware. wr1043nv1_en_3_9_17-sysupgrade.bin OKK
I back on stock TP-LINK firmware, all work with out problem, and WAN port open and work.
I probe to flash my ruter with linux based software (DD-WRT, GARGOYLE) and nothing… WAN port not work . All flashing working method of other people for me not ok, WAN port not work………… Maybe my problem is ruter revision FCC-ID Te7WR1043NX , i not idea how to fix … two days i probe to fix problem but Wan port not work on this software DD-WRT, GARGOYLE.
Nothing folks, I return back my ruter in SHOP and buying model TL-WDR 3600 N600 .
Thanks, CS method worked great for me on v1.8, now at 1.5.9
Awesome Mike, glad to hear it!
Hi bitsector, did the WAN port work in the German version? Sounds like you just need to try again.
Hi bitsector, did the WAN port work in the German version? Sounds like you just need to try again.
————————————————————————————————————————-
Good idea, i tried and test and WAN port work on ger. ver. firmware and i connect on internet, works fine, works the same as the factory ver en firmware, but after flashing my ruter on one of firmware of DD-WRT, GARGOYLE, WAN port not work .
I try all method (of the search google) for fix WAN port, with other old revision firmware (i back on one of this firmware ) and flash with DD-WRT, GARGOYLE, WAN port not works.
Wan port works only on stock firmware.
I tried everything I’ve found on the net, have tested a couple of days…. and WAN port not works on my ruter with this FCC-ID Te7WR1043NX .
It is very important to this ….. I tried the router from my friend the same model different FCC ID with this method as before, and the WAN port is working on that model router with gorgoyie, with other and dd-wrt i not test
Tested model of my friend:
– TL-WR1043ND ver. 1.8
– s/n 1203……
– FCC-ID Te7WR1043ND-00
Todays I return back my ruter in SHOP
THANKS FOR HELP ADVANCED FOLKS !
That’s very strange indeed, but glad you got it working on a replacement. Also, newer versions of OpenWRT apparently have a fix for it so you don’t even have to flash via the German firmware, but I’ve not tested it.
I have got the draytec DV120 and the TP link 1043. Once I have the router set up with gargoyle and Im ready to connect it to the DV120 how I set up the DV120 bridge? Do I connct it in its own to the computer first? Also manual said to use it without adsl filter but my ISP adviced to use filters for all devices connected to the phone line? What should I do?
Thanks in advance.
I downladed gargoyle file but just dont want to take it keep saying choose a file to upgrade 🙁
Make sure you have the latest beta version, such as: http://www.gargoyle-router.com/downloads/images/ar71xx/gargoyle_1.5.9-ar71xx-generic-tl-wr1043nd-v1-squashfs-factory.bin
Basically provided you change the Gargoyle router IP Address to anything other than on the 192.168.1.0/24 range (Make the Gargoyle router something like 192.168.188.1) then plug the Draytek into the WAN port of the Gargoyle router, it’ll work fine.
Filters depend on if you’re on Naked DSL or not. If you’re not on Naked DSL, use filters. If you’re on Naked DSL, you don’t have to, but it doesn’t matter if you do.